This page is a companion to the chapters rather than a chapter in its own right. Nothing here is examined on its own, and you do not need to read it in one sitting. Dip into it when you are stuck on a prompt, when you are about to write about something you generated, or when a deadline is a week away.
Prompt craft that transfers
Prompting is not a set of magic words. The tools change every few months, and any list of phrases that works today will be stale by the time you graduate. What does transfer is the habit of writing a brief: saying who is doing the work, what the work is, and what would count as a good result. The structure below survives most tools, so keep it in a text file and adapt it rather than starting from a blank box each time.
ROLE: You are a [role with relevant expertise].
TASK: [What you want done, in one sentence.]
CONSTRAINTS:
- [Length, style, format]
- [What to avoid]
- [Audience]
CONTEXT:
[Any background the model needs.]
OUTPUT:
[The exact shape you want, with placeholders or an example.]
Be specific, and show rather than tell. “Write it in an academic style” gives the model almost nothing to work with, because every model has its own idea of what that means. A short sample of the voice you want, or one worked example of the output, does more than a paragraph of adjectives. If you can paste in a passage and say “match this register”, do that.
Constrain the form. Say how long, in what format, with what sections, and what must not appear. A model that is told to produce four bullet points of at most fifteen words each will usually comply, whereas one that is asked for “a short summary” will drift towards its own default length. Constraints also make it much easier to compare two attempts, because they differ in content rather than in shape.
Iterate on what is wrong, not on the whole prompt. When a result disappoints, name the specific defect and ask for that one thing to change: “keep the structure, but the second paragraph asserts something the source does not say, so cut it”. Rewriting the entire prompt from scratch throws away the parts that were working and makes it impossible to learn which change helped.
Generate three and veto. Ask for three distinct options rather than one, then reject two. Choosing is faster than correcting, the spread between the three tells you how strongly your prompt constrained the model, and the act of rejecting forces you to say what you actually wanted. This is a good habit for text, and close to essential for images.
Source
from matplotlib.patches import FancyBboxPatch

import matplotlib.pyplot as plt
plt.rcParams.update({
    "font.size": 10,
    "axes.titlesize": 11,
    "axes.labelsize": 10,
    "xtick.labelsize": 9,
    "ytick.labelsize": 9,
    "legend.fontsize": 9,
    "figure.figsize": (10, 4),
    "figure.dpi": 100,
    "savefig.dpi": 150,
    "axes.spines.top": False,
    "axes.spines.right": False,
})

navy, purple, rose = "#1f2545", "#5a2a7a", "#e8556d"

steps = [
    ("Write the brief", "one sentence you\nare trying to satisfy"),
    ("Ask for three", "options, not one"),
    ("Veto two", "choosing is faster\nthan correcting"),
    ("Name the one\ndefect", "not the whole prompt"),
    ("Change one thing", "so the next result\nmeans something"),
]

fig, ax = plt.subplots(figsize=(10, 4.4))
width, gap = 2.2, 0.32
for index, (name, gloss) in enumerate(steps):
    x = 0.4 + index * (width + gap)
    ax.add_patch(FancyBboxPatch((x, 2.0), width, 1.3,
                                boxstyle="round,pad=0.02,rounding_size=0.12",
                                facecolor="#f4f1fa", edgecolor=purple, linewidth=1.7))
    ax.text(x + width / 2, 3.02, name, ha="center", va="top", fontsize=10,
            fontweight="bold", color=navy, linespacing=1.35)
    ax.text(x + width / 2, 2.28, gloss, ha="center", va="bottom", fontsize=9,
            color="#444444", linespacing=1.4)
    if index < len(steps) - 1:
        ax.annotate("", xy=(x + width + gap - 0.03, 2.65),
                    xytext=(x + width + 0.03, 2.65),
                    arrowprops=dict(arrowstyle="-|>", color=navy, lw=1.6))

last = 0.4 + (len(steps) - 1) * (width + gap) + width
ax.plot([last, last + 0.45, last + 0.45, 1.5, 1.5], [2.65, 2.65, 3.85, 3.85, 3.45],
        color=purple, lw=1.6)
ax.annotate("", xy=(1.5, 3.35), xytext=(1.5, 3.6),
            arrowprops=dict(arrowstyle="-|>", color=purple, lw=1.6))
ax.text((last + 1.5) / 2, 3.96, "and round again, until it is right or the brief "
        "changes", ha="center", fontsize=10, color=purple)

ax.add_patch(FancyBboxPatch((0.4, 0.25), last - 0.4, 0.95,
                            boxstyle="round,pad=0.02,rounding_size=0.12",
                            facecolor="#fff0f3", edgecolor=rose, linewidth=1.7))
ax.text((last + 0.4) / 2, 0.9, "The log", ha="center", va="center", fontsize=11,
        fontweight="bold", color=navy)
ax.text((last + 0.4) / 2, 0.53, "the brief, the prompt, the tool and its version, "
        "the output you kept, and why", ha="center", va="center", fontsize=10,
        color="#444444")
for index in range(len(steps)):
    x = 0.4 + index * (width + gap) + width / 2
    ax.annotate("", xy=(x, 1.25), xytext=(x, 1.95),
                arrowprops=dict(arrowstyle="-|>", color=rose, lw=1.3, ls=":"))

ax.set_xlim(0, last + 0.9)
ax.set_ylim(0.1, 4.35)
ax.axis("off")
plt.tight_layout()
plt.show()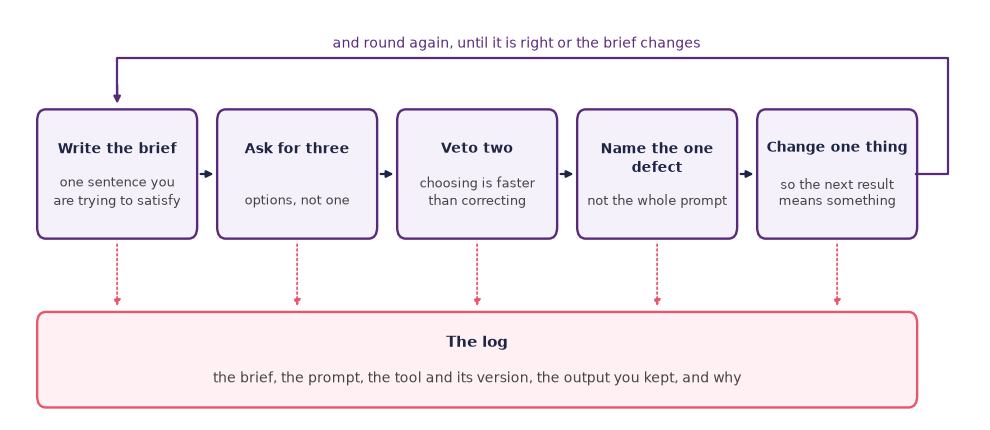
Figure: The loop that most prompting settles into, and the log that every pass through it feeds.
For images, the order in which you state things matters, because most systems weight the beginning of a prompt more heavily. A workable default order is [Subject] | [composition] | [style] | [medium] | [lighting] | [mood] | [extra refs]. For video, add the camera angle and its movement, and say what moves within the scene, since a video model otherwise has to guess whether the world or the camera is in motion. Whatever kind of data you are working with, change one knob at a time. If you alter the prompt, the seed, the guidance value, and the model in a single step, you have learned nothing about which of them mattered. Fix everything except the variable you are studying, run it, note the result, then move on. This is slower for one image and much faster over a semester.
Keeping a decisions and prompt log
Every piece of work you hand in this semester comes with a log. It is not busywork or bureaucracy. It is the only record of how the thing was made, and without it neither you nor anyone else can say what came from the model and what came from you.
Record enough that a stranger could get close to your result. For each attempt that mattered, note:
- Brief. The one sentence you were trying to satisfy.
- Tool and model. The name, and the version or the date you used it.
- Prompt. The exact text, not a paraphrase of it.
- Seed and settings. The seed if there was one, and anything you changed from the defaults.
- Result. What you got, what you expected, and the gap between them.
- Human edits. What you cut, rewrote, retouched, re-recorded, or rearranged.
Keep one log file per project rather than one per week or one per tool. A project log reads as a narrative, and when you come to write your reflection you will find the argument already half made in your own notes. Scattered fragments in a chat history are not a log, because chat histories are edited, truncated, and occasionally deleted by the provider.
The log protects you. If someone questions whether the work is yours, a dated trail of prompts, rejected outputs, and edits is the strongest answer you can give. It also protects you from yourself, because it is remarkably easy to misremember, three weeks later, that a phrase you are proud of was in fact the model’s first suggestion.
It is also simply honest. Claiming a generated image as a drawing, or a model’s argument as your own reasoning, is misconduct whatever the tool. Logging as you go makes the honest version effortless, and it turns a rule you have to obey into a description of what you did.
Use the practice log template as your starting point. The three headings, Explore, Reflect, and Create, are the same three movements as the weekly lab, so the log fills itself in as the week goes along.
Writing about AI-made work
Describe before you interpret. Say what is there in terms a reader could verify by looking or listening, and only then say what you think it means. “The figure’s left hand has six fingers, and the reflection in the window shows a different room” earns a conclusion about the model’s handling of consistency. “The image feels uncanny” does not, because there is nothing in it to check.
Give addresses. A reader cannot follow you to “the one where the colours went strange”. They can follow you to “the third variation at guidance 9”, or “at 0:42, where the camera pans left”, or “the second paragraph of the model’s first reply”. Generations are cheap and numerous, so being able to point at one of them precisely is most of what makes writing about them possible.
Name the tool, the model, its version or the date you used it, and the seed if you have one. A model called by the same commercial name in March and in October is not the same model, and a claim about its behaviour without a date is not checkable. Nobody expects you to reproduce a result exactly. They do expect to know what you were looking at. Chapter 2 explains why the tool and the model are recorded as two separate things.
Separate what the model did from what you did. Write it as two things: this was generated, then I cropped it, colour-graded it, and replaced the sky. Readers, and markers, are interested in both, and blurring them is the fastest way to make a good piece of work look evasive.
Keep your terminology fixed for the length of a text. Decide what you mean by model, tool, prompt, sample, and generation, and stay with it. In this book, a model is the trained artefact, a tool is the interface you reach it through, a prompt is the input you wrote, a sample or a generation is one output. Drifting between these, so that “the AI” sometimes means the model and sometimes the company that made it, makes an argument impossible to follow even when it is right.
Citing models, datasets and generated material
Cite a model the way you cite anything else, from its own documentation rather than from a news article about it. A model card or technical report gives you the author or organisation, the year, the model name, the version, and a URL. Use those. If the developers publish a recommended citation, follow it.
Cite a dataset the same way, from its data card, its documentation page, or the paper that introduced it. Datasets get revised, so the version or the release date matters at least as much as the name. Where a dataset has a licence that restricts use, say so, because the licence is often the point you are making.
For generated material, state in the caption or the accompanying note which tool and version produced it, on what date, and that it was generated at all. That last part is not optional. A reader who has not been told will reasonably assume that a photograph is a photograph.
Use a reference manager. Zotero is free, works with the university’s resources, and will save you many hours over a degree. Beyond the citations themselves, it becomes the start of a research library you keep after the course ends.
There is no single reference style required in this course. Choose one, whether that is APA, Chicago, or Harvard, and apply it consistently. Consistency is what is actually assessed. When you are unsure how to cite something unusual, and generated material is still unusual, follow the guidance from the university library rather than inventing a format.
Figures and captions for generated images
A figure has to work on its own. Assume a reader who skims the images before reading a word, which is what most readers do, and write for that person.
Every figure needs a caption that says what the reader is looking at and what to notice. “Generated portrait” is a label, not a caption. “Generated portrait, showing the smooth skin texture and symmetrical framing typical of the default style” tells the reader where to look and why the figure is in your text at all.
The caption must state that the material is generated and by what. Give the tool and the model with its version or the date. If a seed and a guidance value are relevant to the point you are making, put them in too. Do this even when it seems obvious from context, because figures get reused, screenshotted, and pulled out of their context almost immediately.
Credit your reference images. If you fed the model a photograph, a drawing, or a piece of someone’s work as a reference or a style source, say whose it was and where it came from. This applies to your own earlier work as well, where it is a matter of clarity rather than permission.
Screenshots of tools need the tool name and the date you took them. Interfaces are redesigned constantly, and an undated screenshot of a settings panel is worth very little a year later.
Refer to each figure in your text, so the reader knows when to look at it, and keep the labelling consistent across a document.
Privacy, accounts and UiO
Start from the university’s own guidance. The AI at UiO pages set out which services are approved for which kinds of material, and what the institution’s position is on the use of AI in coursework. That page changes as agreements change, so check it rather than relying on what a friend told you last year.
In the week before teaching starts, students are usually asked to complete a short AI-literacy onboarding. It covers account setup for the term’s tools, a privacy briefing, and the AI at UiO guidelines for student use of AI. It takes well under an hour, and it exists so that nobody spends week 1 discovering they cannot log in.
Never paste personal data into a commercial tool. That includes other people’s names, contact details, health or student records, interview transcripts, and anything else that identifies a living person. The same applies to unpublished research, whether it is yours, your supervisor’s, or a group you are collaborating with, and to other people’s copyrighted work where you do not have a licence covering this use.
When the material is sensitive, prefer the university service or a model running on your own machine. A local model sends nothing anywhere, which makes it the right default for interview material, drafts of unpublished work, and anything covered by a data agreement. This is a practical reason to learn the local route, not only a philosophical one.
Get consent before cloning any voice or face, including a friend’s, a family member’s, and your own if it will end up somewhere public. Ask in writing, say what the clone will be used for and for how long, and record the answer in your log. A person who agreed to appear in a coursework exercise has not thereby agreed to appear in a published exposition, so ask again if the scope changes.
Running models locally
There are four good reasons to run a model on your own machine. Privacy, because nothing leaves the laptop. Reproducibility, because the weights on your disk do not silently change under you the way a hosted service does. Cost, because there is no meter running. And learning, because the moment you have to choose a model size and watch it fill your memory, the abstractions in this book turn into something physical.
A recent laptop in 2026 can do more than most people expect. Small open-weight language models in the few-billion-parameter range run comfortably and are genuinely useful for drafting, summarising, and rewriting. Distilled image models generate at modest resolutions in seconds rather than minutes. Speech recognition runs faster than real time on a laptop CPU, and well on any recent GPU.
What a laptop will not do is match the largest hosted models on hard reasoning, long context, or the polish of the newest image and video systems. That is a real limitation and worth stating plainly. It is also less relevant than it sounds for most coursework, where the constraint is usually your own attention rather than the model’s capability.
The tools page lists current runners and models by category. It is updated more often than this page, so start there for names and links.
Dig deeper: a first local model
Getting a model running locally is a two-command affair on most systems. First install a runner, either through your system’s package manager or with the installer from the runner’s own site. Then pull a small model:
your-runner pull <a small open-weight instruct model>
your-runner run <a small open-weight instruct model>
The runner downloads the weights once, a few gigabytes for a small model, and afterwards works offline. The tools page names current runners, such as Ollama and LM Studio, and suggests models that fit in a laptop’s memory. Start with the smallest model on the list. If it works and feels slow, move up one size and see where your machine gives out. That boundary is useful knowledge in itself.
Preparing the exposition
The course has two kinds of deliverable. The exam is a portfolio, handed in as an exposition on the Research Catalogue in the exam period. It holds the four compulsory assignments revised after feedback, a final piece, a reflection of 1 500 to 2 000 words, and your full prompt log. The four assignments are compulsory, assessed pass or fail, and all of them must be approved before you can sit the exam.
The assignments form a ladder, and each rung is meant to make the next one easier. A1, a self-introduction, is due in week 2. A2, a text in your own discipline, is due in week 5. The ethics essay follows in week 7, and A3, a multimodal mini-piece, in week 8. In week 10 you write a short proposal for the final piece, a checkpoint that is not assessed, where you name its shape and how a reader will move through it in the exposition. Partners review your portfolio draft in week 12, and you hand it in during the exam period. The weekly practice log runs underneath all of it and becomes the prompt log in the portfolio. If you keep it, most of the writing for the later rungs already exists in draft.
Accounts first
Register on the Research Catalogue early. A basic account is free and lets you read and comment, but creating an exposition needs a full account, and the free upgrade requires sending a proof of identity to the platform’s support team. The upgrade takes time, so request it by week 9 at the latest. The Research Catalogue guide describes the steps and the editors.
Building the exposition
Start from the exposition outline and shape the page to the work. A reader should meet the work before reading about it, so put the media near the top: the video, the sound, the image series, or the embedded piece. Then let the text explain what the reader has just met. The brief in one sentence, one artefact pointed at rather than described, one surprise, one act of your own creative will, and one open question is a structure that works for most pieces. Put the final piece first, then the four revised assignments, each with a short note on what the feedback changed.
Prepare the surprise and the act of will early. “Where did the AI surprise you?” and “Where did you exert your own creative will?” are the two questions the course keeps returning to, and a vague answer to either is the most common weakness. Point at a specific moment in a specific artefact, and put the answer next to that artefact in the exposition.
A piece that was made to be live needs a translation. Record a performance or a reading, film an interactive piece in use as well as embedding it, and photograph or film a printed object from more than one side. The recording is not the work, so say in the text what the recording misses.
A checklist before you hand in
- Upload media in formats the Research Catalogue handles well. It converts video and audio to common web formats on upload, so check that the converted version still sounds and looks the way you intended.
- Keep every file you upload at a reasonable size. A reader on a phone should not wait a minute for the first image.
- Label every generated artefact as generated, with the tool, the model, and the version or date, in the form chapter 7 introduced for provenance cards.
- Check that the exposition reads in order from the top, and that nothing important depends on a reader finding a corner of the page.
- Open the share link in a private browser window, where you are not logged in, and check that every video, sound, and embedded piece plays. A link that needs a login, or a file shared with the wrong permissions, is a common failure in online work.
- Make the PDF copy with your browser’s print function on the day you hand in, and check that the text is complete in it. Hand in the URL, the PDF, the reflection, and the prompt log in Canvas. The PDF is what is assessed, and the URL is what lets the examiners play the media.
Giving back to the commons
This course draws on a great deal of open material: openly licensed sounds and images, free encyclopaedias, open-weight models, and open-source tools. Much of it was also scraped into the training data of the commercial models you use. Giving something back is optional and is not assessed, but it is a good habit, and each of the platforms below has thought harder than most about what AI-generated material does to a commons. Their rules are worth reading for that alone.
- Freesound is a collaborative database of sounds, all released under Creative Commons licences. Field recordings and sound effects you made yourself are the most useful contributions. Generated sounds are allowed but should be flagged as AI-generated in the description form, and the Generative AI preferences panel in your account settings lets you say whether your sounds may be used to train models.
- Wikimedia Commons is the media archive behind Wikipedia. It only hosts media that are realistically useful for education, so a photograph of a building, an instrument, or a place that lacks a good picture is welcome, and a pretty generated image usually is not. Its guideline on AI-generated media asks for generated images to be labelled, and notes that in most jurisdictions an image made by a machine without a human author has no copyright at all.
- Wikidata holds structured facts, released under CC0, which means anyone may reuse them for anything. Adding or correcting items for the works, artists, tools, models, and datasets you meet in the course is quick, and each statement should carry a reference.
- Wikipedia is the most visible of the four, and the strictest. Since March 2026, English Wikipedia has prohibited article text that is generated or rewritten by language models, allowing only basic copyediting of your own writing and translation you can check yourself. Contributions are therefore written by hand from sources you have read. The Norwegian editions, bokmål and nynorsk, set their own rules, so check them before you edit there.
- The Research Catalogue is itself an open, non-commercial venue. If you choose to publish your exposition after the grade, with a Creative Commons licence, it joins the record of artistic research that future students and researchers can read and cite.
Study technique for a flipped course
This course is flipped, which means the reading comes before the meeting rather than after it. Read the chapter first, and arrive with one question written down. One is enough. A seminar where fifteen people each brought a real question is a completely different event from one where nobody did.
Work in blocks of about thirty minutes with actual breaks between them, rather than in long unbroken sessions. Reading a chapter of this book twice in two focused blocks will get you further than three hours with a phone nearby, and it is easier to start.
After reading, close the book and explain a concept aloud as if to someone who has never met it. The places where you stumble are exactly the places you did not understand, and they are invisible while the text is still in front of you.
Turn the section headings into questions before you reread. “Diffusion models” becomes “how does a diffusion model turn noise into an image, and why does it work backwards?”. Then answer from memory, and reread only to check.
Use an AI assistant to quiz you on the chapter, then check its answers against the text. It is good at generating questions, and equally confident whether or not it is right, so the checking is not optional. Doing that checking is itself the exercise, since noticing where a fluent answer departs from the source is most of what this course is trying to teach you.