Quick Start Guide
Welcome to MGT-python! This guide will get you up and running with the Musical Gestures Toolbox in just a few minutes.
Prerequisites
Make sure you have MGT-python installed. If not, see the Installation Guide.
Your First MGT-python Script
Let's start with a simple example using the built-in sample videos:
import musicalgestures as mg

# Access example videos
examples = mg.examples
print(f"Dance video: {examples.dance}")
print(f"Pianist video: {examples.pianist}")

# Load a video
mv = mg.MgVideo(examples.dance)
print(f"Loaded: {mv.filename}")
print(f"Duration: {mv.length:.2f} seconds")
print(f"Frame rate: {mv.fps} fps")
Core Concepts
MgVideo Class
The MgVideo class is your main interface for video analysis:
# Load your own video
mv = mg.MgVideo('path/to/your/video.mp4')

# Or use preprocessing options
mv = mg.MgVideo(
    'path/to/video.mp4',
    starttime=10,      # Start at 10 seconds
    endtime=30,        # End at 30 seconds
    color=False,       # Convert to grayscale
    filtertype='Regular',  # Motion detection filter
    threshold=0.1      # Motion threshold
)
MgAudio Class
For audio-only analysis:
# Load audio from video or audio file
ma = mg.MgAudio('path/to/audio.wav')

# Or extract audio from video
mv = mg.MgVideo('video.mp4')
ma = mv.audio  # Get the audio component
Basic Analysis Workflows
1. Motion Analysis
Extract motion information from your video:
mv = mg.MgVideo(examples.dance)

# Perform motion analysis — returns MgVideo pointing to the motion video
motion_video = mv.motion()
motion_video.show()           # watch the motion video
mv.show(key='motion')         # equivalent shorthand via source MgVideo

# Motion data (QoM, CoM, AoM per frame) is saved as a CSV alongside the video
import pandas as pd
import os
csv_path = os.path.splitext(motion_video.filename)[0].replace('_motion', '_motiondata') + '.csv'
data = pd.read_csv(csv_path)
print(data.head())
Recent motion-analysis fixes ensure centroid-of-motion coordinates are computed as scalar values during motion() and motiondata() runs, which makes notebook and batch execution more robust.
2. Create Visualizations
Generate various visualizations:
mv = mg.MgVideo(examples.pianist)

# Motiongrams — returns MgList with [horizontal_mgram, vertical_mgram]
motiongrams = mv.motiongrams()
motiongrams[0].show()  # horizontal motiongram
motiongrams[1].show()  # vertical motiongram
mv.show(key='horizontal')  # shorthand from source MgVideo

# Average image (blend of all frames)
average_img = mv.average()
average_img.show()

# Motion history
history = mv.history()
history.show()
Face anonymization also returns a usable result object even when exporting face-coordinate data:
3. Audio Analysis
Analyze the audio component:
mv = mg.MgVideo(examples.pianist)

# Get audio object
audio = mv.audio

# Create waveform plot
waveform = audio.waveform()
print(f"Waveform plot: {waveform}")

# Generate spectrogram
spectrogram = audio.spectrogram()
print(f"Spectrogram: {spectrogram}")

# Extract audio descriptors
descriptors = audio.descriptors()
print(f"Descriptors: {descriptors}")
4. Pose Estimation
mv = mg.MgVideo(examples.dance)

# pose() defaults to the MediaPipe backend: fast on plain CPU, no CUDA-enabled
# OpenCV build needed, 33 landmarks with depth + visibility (best for one person).
pose_video = mv.pose()
pose_video.show(mode='notebook')

# OpenPose models ('body_25', 'coco', 'mpi') support multi-person analysis but are
# slow without a CUDA-enabled OpenCV build:
pose_video = mv.pose(model='mpi', device='gpu', downsampling_factor=2)
On first use, pose estimation downloads the requested model weights if they are not already present (MediaPipe weights by default).
5. Optional GPU Acceleration
mv = mg.MgVideo(examples.dance)

# CPU is the default for flow and blur_faces.
dense_cpu = mv.flow.dense()
blur_cpu = mv.blur_faces()

# Opt in to CUDA acceleration (falls back to CPU automatically).
dense_gpu = mv.flow.dense(use_gpu=True)
sparse_gpu = mv.flow.sparse(use_gpu=True)
blur_gpu = mv.blur_faces(use_gpu=True)

# Check CUDA availability reported by OpenCV.
print(mg.get_cuda_device_count())
6. Resampling (frame rate / speed)
resample() returns a new MgVideo (the original is untouched) re-timed by frame rate, playback speed, or frame decimation:
mv = mg.MgVideo(examples.dance)

mv25 = mv.resample(fps=25)        # retime to 25 fps (duration-preserving)
fast = mv.resample(speed=2.0)     # 2× faster, video + audio in sync
mv25.show()
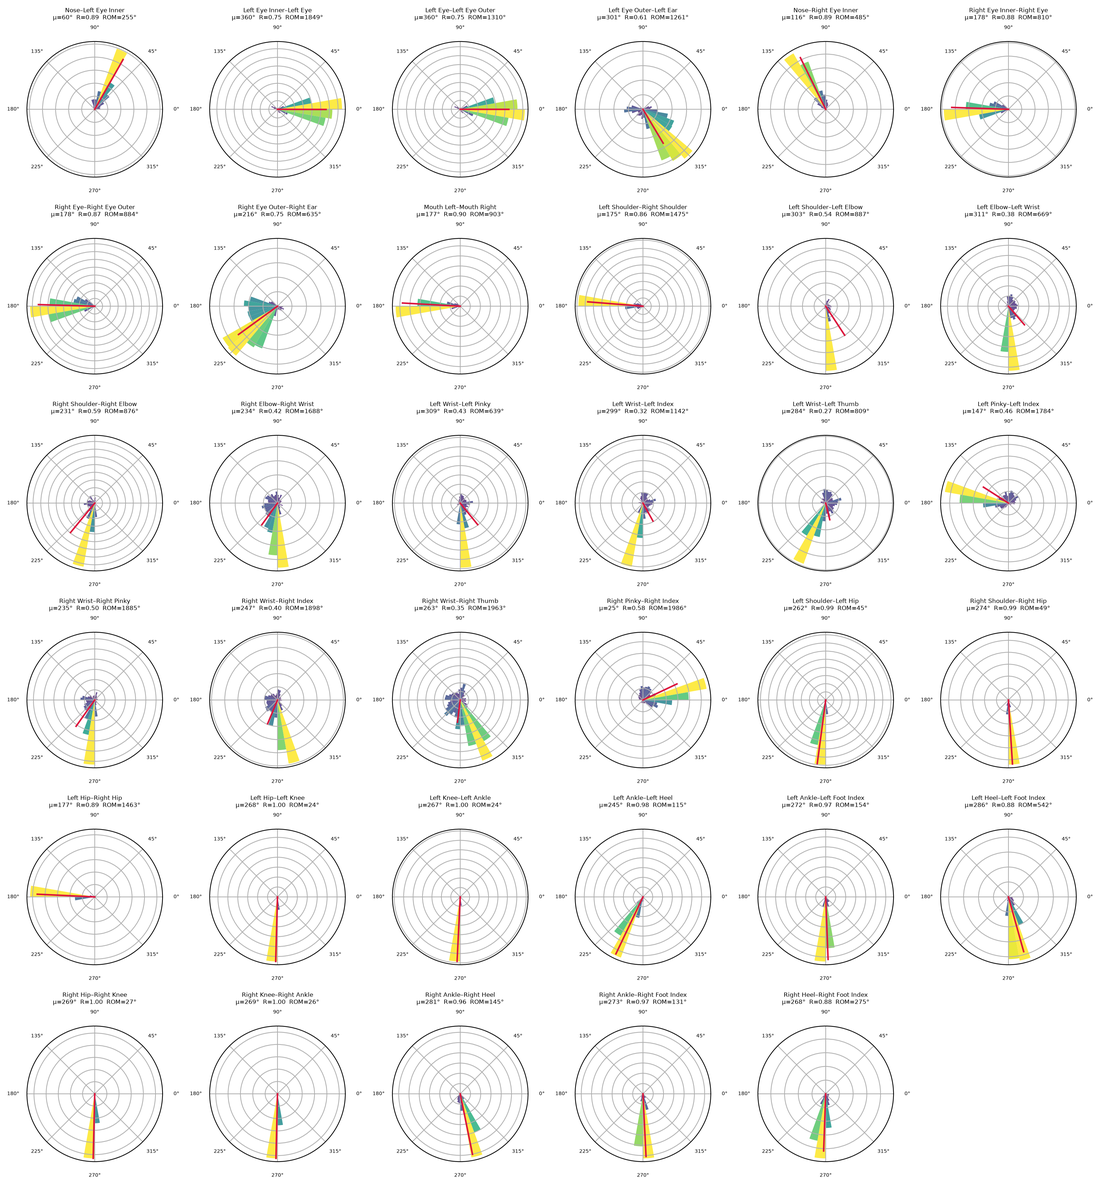
7. Pose segment statistics
pose_segments() draws a polar rose plot and circular statistics for each body segment (the bone between two joints):
mv = mg.MgVideo(examples.dance)
mv.pose_segments().show()         # reuses cached pose keypoints if available
8. Audio–movement tempo similarity
tempo_similarity() compares the audio tempo with the movement tempo and cross-correlates the two rhythms:
mv = mg.MgVideo(examples.dance)
ts = mv.tempo_similarity()
ts.show()
print(ts.data['audio_tempo_bpm'], ts.data['motion_tempo_bpm'])

See the dedicated Audio-Video Processing & Analysis page for the full suite (phase synchrony, structure comparison, body–audio and dynamics coupling).
Working with Your Own Videos
Supported Formats
MGT-python works with most common video formats: - MP4, AVI, MOV, MKV - Audio: WAV, MP3, FLAC, etc.
Basic Processing Pipeline
# 1. Load and preprocess
mv = mg.MgVideo(
    'my_video.mp4',
    starttime=5,       # Skip first 5 seconds
    endtime=60,        # Use only first minute
    color=False        # Grayscale for motion analysis
)

# 2. Perform motion analysis
motion = mv.motion()

# 3. Create visualizations
motiongrams = mv.motiongrams()
average = mv.average()

# 4. Analyze audio
audio_analysis = mv.audio.spectrogram()

print("Analysis complete!")
Understanding Output Files
MGT-python creates several types of output files:
Video Files
*_motion.avi- Motion detection video*_history.avi- Motion history visualization
Image Files
*_average.png- Average of all frames*_mgh.png- Horizontal motiongram*_mgv.png- Vertical motiongram
Data Files
*_motiondata.csv- Numerical motion data*_descriptors.csv- Audio feature data
Working Directory
By default, outputs are saved in the same directory as your input video. Use target_name on individual methods to control the output path for a specific result.
Interactive Analysis
Jupyter Notebooks
MGT-python works great in Jupyter notebooks:
import musicalgestures as mg
import matplotlib.pyplot as plt

# Load video
mv = mg.MgVideo(mg.examples.dance)

# Create motion analysis
motion = mv.motion()

# Display results inline
plt.figure(figsize=(12, 4))
mv.show()  # Shows the video player
Batch Processing
Process multiple videos:
import glob

video_files = glob.glob('videos/*.mp4')

for video_file in video_files:
    print(f"Processing: {video_file}")
    mv = mg.MgVideo(video_file)

    # Perform analysis
    motion = mv.motion()
    motiongrams = mv.motiongrams()

    print(f"Completed: {video_file}")
Next Steps
Now that you're familiar with the basics, explore more advanced features:
- Loading & Showing - How to load videos and display results
- Preprocessing - Trim, crop, rotate, and adjust videos
- Video Analysis - Motion analysis, optical flow, pose estimation
- Audio Analysis - Waveforms, spectrograms, and audio features
- Working with Results - MgFigure, MgImage, MgList, and chaining
- API Reference - Complete method documentation
Common Issues
Video Won't Load
# Check if file exists and is readable
import os
video_path = 'my_video.mp4'
if os.path.exists(video_path):
    print(f"File found: {video_path}")
else:
    print(f"File not found: {video_path}")
FFmpeg Errors
If you get FFmpeg-related errors, ensure FFmpeg is installed:
See the Installation Guide for help with FFmpeg setup.
Memory Issues with Large Videos
For large videos, consider:
# Process shorter segments
mv = mg.MgVideo('large_video.mp4', starttime=0, endtime=30)

# Or thin out the frames at load time (keep 1 of every skip+1 frames)
mv = mg.MgVideo('large_video.mp4', skip=2)

# Or re-time an already-loaded video to a lower frame rate
mv = mg.MgVideo('large_video.mp4').resample(fps=15)
Ready to dive deeper? Check out our comprehensive User Guide!